Installation Articles
Installing Paya Connect Desktop
Product
Paya Connect Desktop (PCD)
Description
These are the instructions for installing Paya Connect Desktop on a computer as a new installation.
Resolution
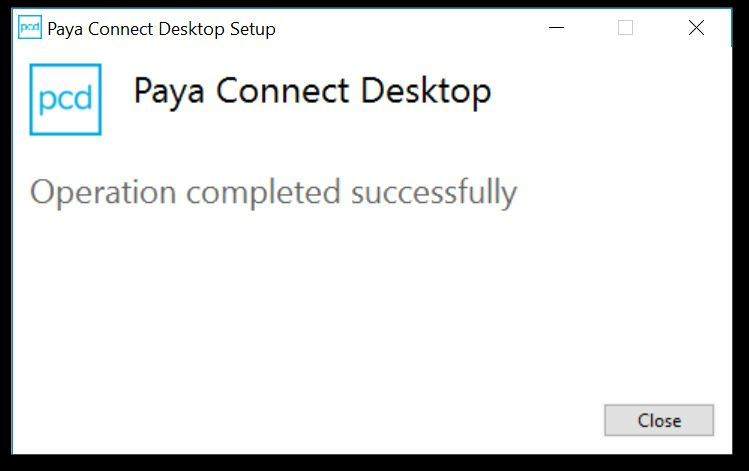
Paya Connect Desktop requires the installation of a desktop application. This desktop application uses ClickOnce as its deployment and requires System Administrator level access to install. This can be installed by downloading the most current version of the installer compatible with your integration from the Paya Connect Desktop Installation page. The software can be installed from the bootstrapper file locally or from a network file share.
There is a Silent Installation solution for Enterprise-Level Organizations which allows IT Teams to apply the update to group policies. For more information about the Silent Installer please read the following article below:
How do I use the Paya Connect Desktop Silent Installer?
Steps for a basic installation of the Paya Connect Desktop:
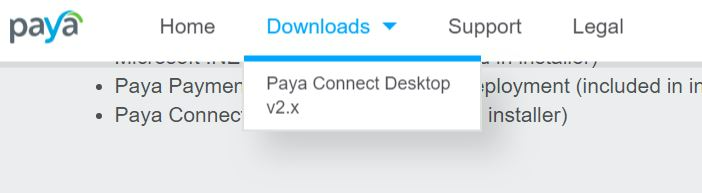
- Choose Downloads in the top navigation bar to begin.
- The PCD install will need to be performed for each user, allowing the application to be self-updated from the web without interfering with other users’ installations.
- Once the bootstrapper has been downloaded, navigate to the folder where it is located.
- Extract the folder.
- Right-click on the Extracted Bootstrapper and select Run as Administrator, please note that if you do not have the required permissions you will not be able to successfully install PCD.
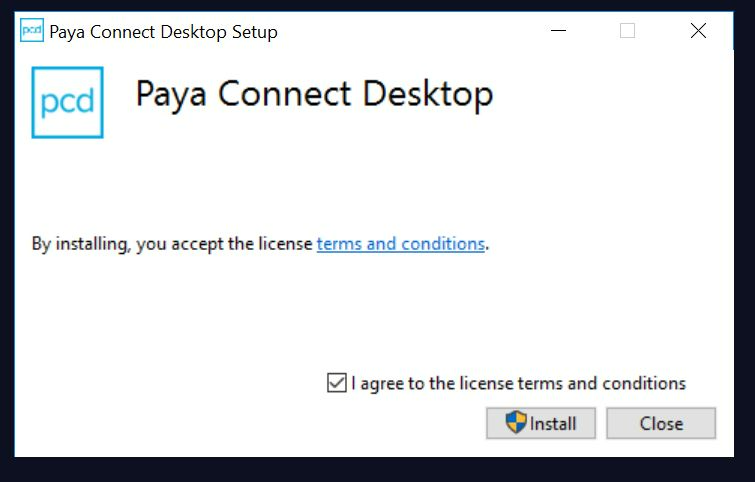
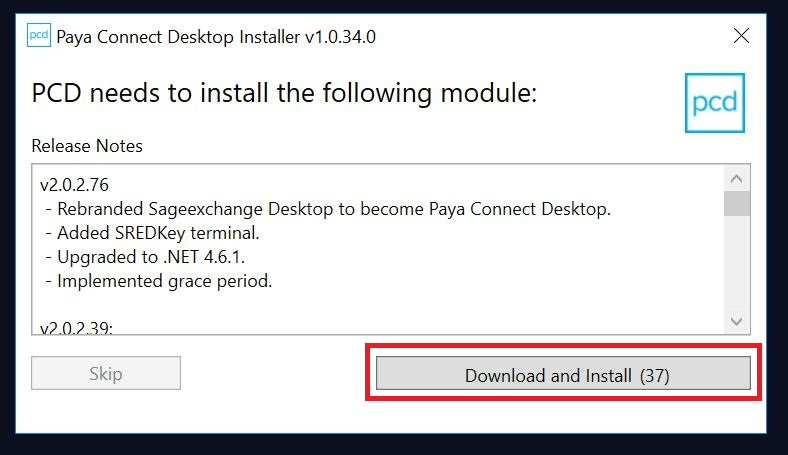
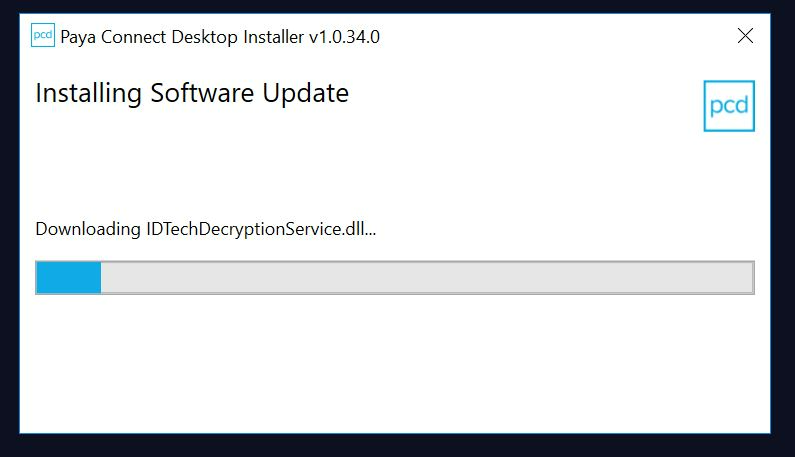
- Once the installation is complete, another installation window will appear to complete the installation to the most current version of the software.
- Click Download and Install to complete the installation.
- Paya Connect Desktop will run in the system tray after installation and will automatically start up every time the computer is restarted.
If you have questions or require additional information, please contact us and we will be in touch with you shortly.
How to use the Paya Connect Desktop Silent Installer
Product
Paya Connect Desktop
Description
Paya offers an enterprise-level solution for rolling out the Paya Connect Desktop. The Silent Installer will allow System Administrators to push new installations and updates to users through pushed network installations (group policies). This solution will help IT Teams that would like to prevent users from updating Paya Connect Desktop themselves due to security policies or specific update vetting procedures.
Resolution
Please Note: If you think this solution will fit your organization's needs, please contact your System Administrator before attempting to use this solution.
The Silent Install version of Paya Connect Desktop is recommended for larger organizations that have admin restrictions at the user/workstation level. It is also useful for enterprise organizations that have the ability to push network installation (group policy). The Silent Install version does not update automatically. PCD Silent Installation is a Windows Installer file (a file with MSI extension) that internally uses the standard PCD installation process but does not require any user input.
Requirements
PCD Silent Installation requires the following items:
- Internet access to download the latest PCD Bootstrapper
- AppDeploy version 1.0.5 or higher (delivered inside the Bootstrapper package)
Installation
- To install PCD using the Silent Installer, please complete the following:
- Navigate to https://www.sageexchange.com/install
- Select Paya Connect Desktop from the downloads menu at the top of the page.
- Scroll down to the 'Silent Installation' section and click 'Download Installer' in the Paya Connect Desktop Distributor row.
- Run the file when it has finished downloading. The file installs the latest version of PCD without displaying any user interface. No additional user actions are required during the installation.
- When the installation is completed, a Paya Connect Desktop shortcut will be available in the Start Menu under the Paya folder.
Distribution
The PCD Silent Installer installs the Paya Connect Desktop Distributor application. The PCD Distributor application includes the following features:
- Install PCD in attended and unattended/silent modes
- Check whether a user skipped the last PCD update
- Enable and disable the PCD update check that is usually performed when the application launches
The PCD Distributor application is installed in one of the following locations depending on your System Architecture:
- Program Files\Sage Payment Solutions\Application Distributor
- Program Files (x86)\Sage Payment Solutions\Application Distributor
The following user interface displays when you execute the Application Distributor program without any command-line arguments:
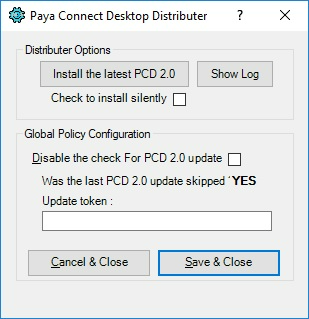
- Select the appropriate options for your system and click Save and Close
The PCD Distributor application supports the following command-line arguments:
- /Quiet – Hides the UI and installs the latest available PCD without any user interaction.
- /EnablePCDUpdate - Enables PCD check for updates every time PCD starts.
- /DisablePCDUpdate - Disables PCD check for updates every time PCD starts.
- /? or /ShowEvents - Shows help information in the event viewer window and waits for PCD installation events as shown in the image below:

If you have questions or require additional information, please contact us and we will be in touch with you shortly.
Set up and Configuration Articles
Configuring Paya Connect Desktop Settings
Product
Paya Connect Desktop
Description
Use the Paya Connect Desktop Settings window to configure devices and other settings. This window consists of a tree menu on the left-hand side and the settings window on the right-hand side. The settings on the right-hand side change according to which heading of the tree you have selected.
Resolution
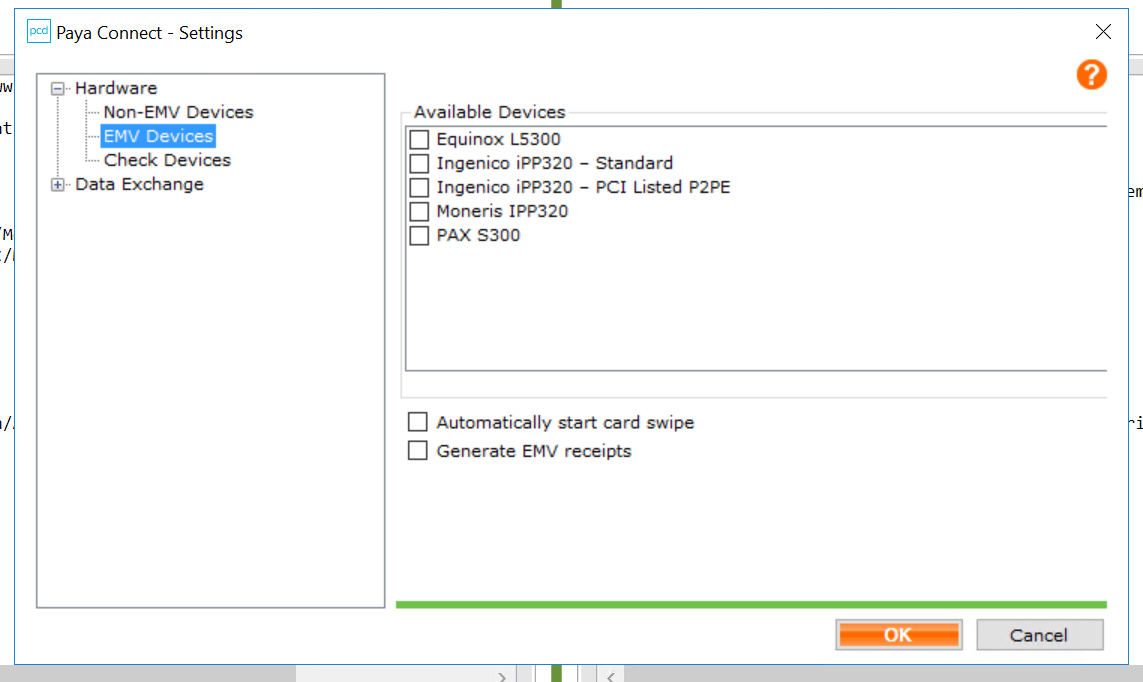
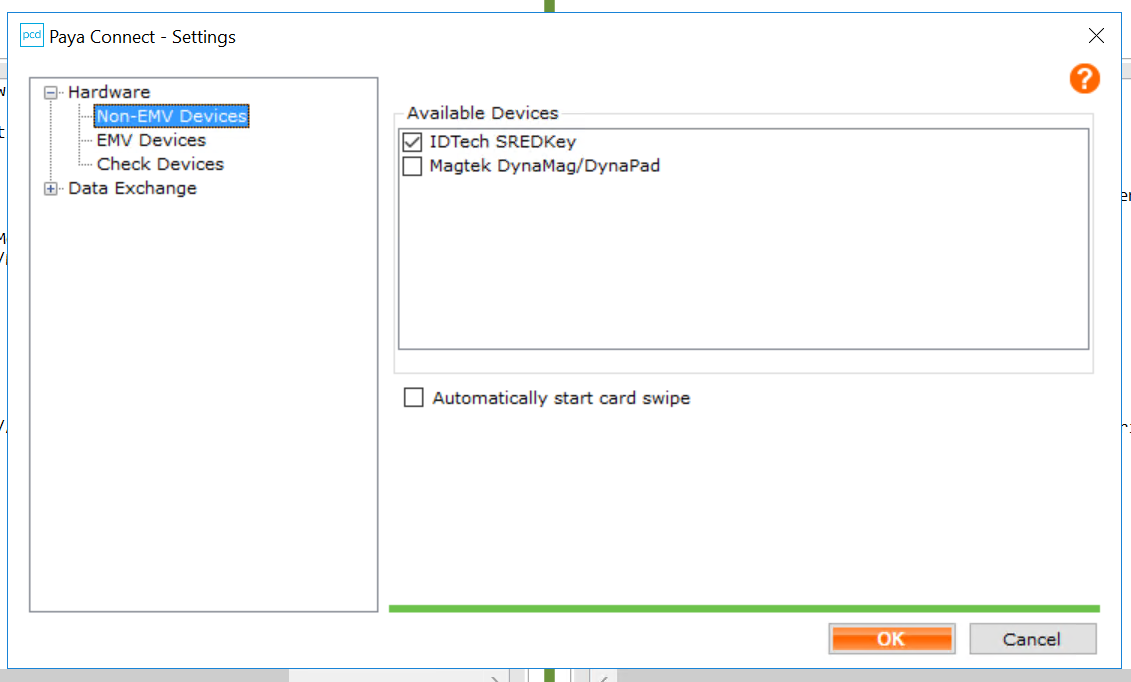
Use the Hardware menu to configure Paya Connect Desktop to use devices such as an EMV card read.
- Right-click the PCD icon in the Microsoft Windows system tray to open the Paya Connect Desktop menu.
- Select Settings to open the Paya Connect Desktop – Settings window.

- Expand Hardware > (select the device type from the menu) and then select the device from the list.
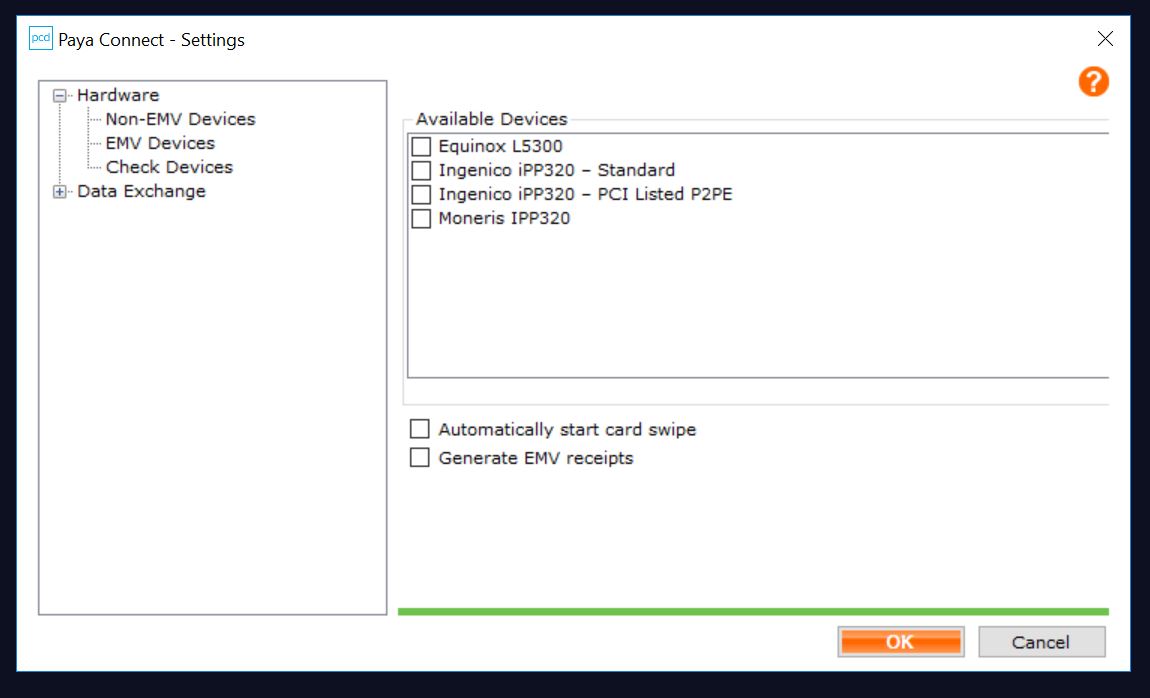
- Optionally, mark Automatically start card swipe if you want the device to automatically prompt you for the card-reading interface if you will be swiping credit cards for most transactions.
- Click OK to accept your selections and to close the Paya Connect Desktop - Settings window.
- Right-click the PCD icon and then select Restart application if you marked Automatically start card swipe to fully enable the functionality.
Use the Data Exchange menu to configure Paya Connect Desktop for use with Paya Exchange and Sage Software. This menu allows for data sharing for postback options such as setting up e-Invoicing within Sage50. Please contact our Support Teams if you need additional assistance with these configurations.
If you have questions or require additional information, please contact us and we will be in touch with you shortly.
How-to Articles
How to Use Paya Connect Desktop and Paya Exchange to Share Data
Product
Paya Connect Desktop (PCD)
Paya Exchange (PEMS)
PCD Integrated solutions
Description
Paya Exchange is a simple, all-in-one payment management system, where you can connect all forms of payment devices to your accounting software.
You can connect your credit card payment devices (such as the Ingenico iPP320) and mobile devices using Sage Mobile Payments to Paya Exchange. This allows Paya Exchange to provide you with up-to-date views into your connected payments network.
Paya Connect Desktop serves as the connection point between your accounting application and Paya Exchange; therefore, you must install and configure it if you want to use Paya Exchange. If you have not yet installed Paya Connect Desktop, click Install Paya Connect Desktop on the Login page of Paya Exchange.
Resolution
Configuring Paya Connect Desktop for use with Paya Exchange
After installing Paya Connect Desktop, you must configure it for use with Paya Exchange.
The configuration process consists of:
- Registering (or pairing) your Paya Connect Desktop installation in Paya Exchange, which will allow you to access your accounting data.
- Installing and enabling plugins.
- Select specific General Ledger (GL) accounts for each installed plugin. The plugin configuration process allows you to select which GL accounts you want to make available for selection when you create a connection in Paya Exchange.
After registering Paya Connect Desktop in Paya Exchange and configuring plugins, you can begin adding devices such as credit card swipers, check readers, shopping cart web pages, and mobile devices running Sage Mobile Payments as components in Paya Exchange. You can then create connection maps in Paya Exchange.
Registering Paya Connect Desktop in Paya Exchange
Follow the steps below to register your Paya Connect Desktop installation in Paya Exchange:
- Right-click the PCD Icon running in the Microsoft Windows system tray then select Settings to open the Paya Connect Desktop - Settings window.
- Expand the Data Exchange menu then click Register.
- Enter your Paya Exchange email address in the User name field.
- Enter your Paya Exchange password in the Password field.
- Click Register to complete the registration process and to add the Paya Connect Desktop installation as a component in Paya Exchange. Do not close the Paya Connect Desktop - Settings window.
Installing and Configuring plugins
This section includes a procedure for each available plugin in Paya Connect Desktop. After registering Paya Connect Desktop in Paya Exchange, follow the procedure for the plugin that corresponds to your application.
Understanding PostBack
Cash sales and invoice payment connections generate postback transactions from Paya Exchange. If you are installing and configuring the Sage50 (or Sage100) Accounting plugin, the posting method you selected for your company determines how Sage Accounting software handles postback transactions:
- Real-Time - Transactions that users enter (then save) in Paya Exchange connected applications immediately post to the designated general ledger accounts in the accounting application.
- Batch - Transactions are saved as a batch that you must manually post in Sage Accounting software. Using this method, you review the batch of transactions then choose the journals to which you want to post the transactions on the Post window (Tasks > System > Post).
- SmartPosting (Recommended) - Available only to Sage Quantum Accounting companies, SmartPosting is a service that automatically searches the accounting application’s database at regular intervals for saved transactions to post to the general ledger accounts.
If you are installing a plugin on a multi-user workstation, we recommend installing it for only one user (typically the system administrator). This will prevent other users from accessing the general ledger accounts.
To Install and Configure the Sage50 Plugin
- Open Sage50 and connect to the company you want to use with Paya Connect Desktop. Minimize the Sage50 window but keep the application open.
- Restore the Paya Connect Desktop – Settings window then expand the Data Exchange menu.
- Click Get Plugins to search for available plugins.
- Locate the Sage50 plugin that corresponds to your installed version of Sage50.
- Click Install to install the Sage50 plugin.
- Click Yes to enable the plugin.
- Click My Plugins to view your installed plugin.
- Click Options to open the Sage50 window.
- Click the Please Select your Company link to open the Company window.
- Select the company you want to connect to in the Company field then click OK. The Paya Connect Desktop may display an error message. If so, click OK to close the error then click OK to close the Sage50 window.
Note: Paya Connect Desktop can connect to only one company. Additionally, you cannot change the company selection.
- Restore the Sage50 window, where the Third-Party Application Access window displays.
- Mark Always Allow access then click OK to close the Third-Party Application Access window.
- Optionally, select Maintain > Company Information > Posting Method to open the Posting Method window, where you can verify (or change) the selected posting method.
- Close Sage50 then restore the Paya Connect Desktop – Settings window.
- Click the My Plugins node.
- Click Options to open the Sage50 window.
- Click the General Ledger journal you want to work on within the left-hand pane. Paya Connect Desktop populates the right-hand pane with the General Ledger numbers in the selected journal.
- Mark the Account ID column for each General Ledger account you want to make available for selection when adding a connection in Paya Exchange. Optionally, enter a keyword in the search field to filter the General Ledger accounts.
- Click OK to accept your selections and to close the Sage50 window.
- Click OK to close the Paya Connect Desktop – Settings window.
To Install and Configure the Sage100 Plugin
Before you begin the procedure below, open Sage100 and connect to the company you want to use with Paya Connect Desktop. Minimize the Sage100 window but keep the application open.
- Restore the Paya Connect Desktop - Settings window then expand the Data Exchange node.
- Click Get Plugins to search for available plugins.
- Click Install to install the Sage100 plugin.
- Click Yes to enable the plugin.
Note: If Sage100 is not running, Paya Connect Desktop automatically opens the Sage100 - User Login window, where you must log on to Sage100.
- Click My Plugins to view the installed plugin.
- Click Options to open the Sage100 window.
- Mark the company that contains the journals you want to make available for selection when adding a connection in Paya Exchange in the Select the companies you want to access in the Paya Exchange group box. Paya Connect Desktop may display an error message. If so, click OK to close the error then click OK to close the Sage100 window.
- Restore the Sage100 window, where the Third-Party Application Access window displays.
- Mark Always Allow access then click OK to close the Third-Party Application Access window.
- Optionally, select Maintain > Company Information > Posting Method to open the Posting Method window, where you can verify (or change) the selected posting method.
- Close Sage100 then restore the Paya Connect Desktop - Settings window.
- Click the My Plugins node.
- Click Options to open the Sage100 window.
- Mark the journals that contain General Ledger accounts you want to make available for selection when adding a connection in Paya Exchange in the Source Journal List group box.
- Mark the Account ID column for each General Ledger account you want to make available for selection when adding a connection in Paya Exchange in the G/L Account List group box.
- Optionally, select another company in the Select the Companies you want to access in the Paya Exchange group box then repeat steps 14 and 15 to make general ledger accounts from another company available for selection in Paya Exchange.
- Click OK to accept your selections and to close the Options window.
- Click OK to close the Paya Connect Desktop - Settings window.
To Install and Configure the Sage300 Plugin
- Restore the Paya Connect Desktop - Settings window then expand the Data Exchange node.
- Click Get Plugins to search for available plugins.
- Click Install to install the Sage300 plugin.
- Click Yes to enable the plugin.
- Click My Plugins to view the installed plugin.
- Click Options to open the Paya Exchange - Sage300 window.
- Mark the company that contains the General Ledger accounts you want to make available for selection when adding a connection in Paya Exchange in the Select Company group box.
- Click a journal in the Select Accounts group box to display its General Ledger accounts in the right-hand side of the group box.
- Mark the General Ledger accounts you want to make available for selection when creating a connection in Paya Exchange.
- Repeat steps 7‐9 as necessary to select additional General Ledger accounts.
- Click OK to accept your selections and to close the Paya Exchange - Sage300 window.
- Click OK to close the Paya Connect Desktop - Settings window.
Managing Plugins
Follow the procedure below to check for plugin updates or to disable a plugin
To search for and install plugin updates
- Right-click the SE icon running in the Microsoft Windows system tray then select Settings to open the Paya Connect Desktop - Settings window.
- Expand the Data Exchange node.
- Click My Plugins to view your installed plugins.
- Click Check for plugin updates in the upper-right hand corner to search for plugin updates.
- Click Yes to install each available plugin update.
To disable a plugin
- Right-click the SE icon running in the Microsoft Windows system tray then select Settings to open the Paya Connect Desktop - Settings window.
- Expand the Data Exchange node.
- Click My Plugins to view your installed plugins.
- Click Disable for the plugin you want to disable.
- Click OK to accept your changes and to close the Paya Connect Desktop - Settings window.
Adding a Connection in Paya Exchange
After configuring the plugin for your accounting software, follow the procedure below to add a connection map in Paya Exchange.
- Go to https://www.sageexchange.com to access Paya Exchange then enter your login credentials in the User Name and Password fields.
- Click the Connections tab to open the Connections page.
- Click the Accounting Software plugin in the Connections Map section to display the connections map below.
- Locate the component you want to connect in the Components section.
- Drag and drop the component from the Components section to an empty place on the connections map to open the Connection Type page of the Map Connection window.
- Select the connection type in the Select connection type field and then click Next to open the Settings page of the Connection Map window.
- Select the appropriate general ledger account numbers and settings for each account:
Note: The configuration fields vary depending on the selected plugin. If a General Ledger account number is not listed in a field, open Paya Connect Desktop and review the selected general ledger account numbers for the plugin
Cash Sale Connections
- If you are connecting to Sage50 (or Sage100) Cash Sales, select the General Ledger account to which you want to:
- Debit the total amount in the Total Account field.
- Credit the subtotal amount in the Subtotal Account field.
- Credit the tax amount in the Tax Account field, then select how taxes are calculated and posted:
- No Tax. Do not calculate tax.
- Tax from Device. Paya Exchange uses only tax amounts provided by the component. No additional calculation is performed.
- Calculate Tax After Deductions. Calculate tax as a fixed percentage of the total transaction after any other deductions are applied. Enter a tax rate in the Rate field to apply the amount to all transactions.
- Calculate Tax On Total. Calculate tax as a fixed percentage of the total transaction. Enter a tax rate in the Rate field to apply the rate to all transactions.
- Credit the tax amount in the Shipping Account field, then select how shipping is calculated and posted to the account:
- No Shipping. Do not calculate shipping.
- Shipping From Device. Paya Exchange uses only shipping amounts provided by the component. No additional calculation is performed.
- Calculate Shipping. Calculates shipping as a fixed percentage of the total transaction. Enter a shipping rate in the Rate field to apply the amount to all transactions.
- Flat Rate. Calculates shipping as a fixed dollar amount based on the rate entered in the Rate field. This amount will be applied to all transactions.
Note: The tax and shipping calculations are not added to the transaction amount; conversely, they reduce the transaction total by the rate you enter in the Rate field. If the device captures and reports tax and shipping data, the reported data will override the calculated data. Paya makes no representations or warranties, expressed or implied, as to the results produced by the operation, except as expressly provided herein.
Invoice Payment Connections
- Select the General Ledger account to which the receipt is deposited in the Cash Account field of the Add Receipt group box.
- Select the General Ledger account to which the customer payment is deposited in the Cash Account field of the Customer Payment Group box.
Export Connections
- Enter a name for the data file in the Name field.
- Select Daily, Weekly, Monthly, Quarterly, or Annually in the Period field to select when the export occurs after the start date.
- Enter a date range for the export in the Start Date and End Date fields.
Note: Click More > Data Files on the Reports page to access your exported data files.
- Click Next to establish the connection and to return to the Connections page.
Viewing Transactions in your Accounting Application
The type of connection you add to Paya Exchange determines which General Ledger account you must open in your accounting application to view postback transactions:
- Cash Sales - Open your accounting application and view transactions for your General Ledger account you selected in the Total Account field on the Settings page of the Map Connection window.
Note: If you selected the Batch posting method for your Sage Accounting company, cash sales postback transactions do not display in the General Ledger account until after batch settlement.
When you use Sage Mobile Payments to process a credit card sale (non‐invoice), Sage Mobile Payments will create a corresponding transaction in Sage Accounting for the selected General Ledger account. However, if you process a cash sale, Sage Mobile Payments will not create a corresponding transaction in Sage Accounting. You must manually record the transaction in Sage Accounting for the General Ledger account.
Tap History in Sage Mobile Payments to review a record of the cash sales you need to enter in Sage Accounting. Additionally, you can log on to My Sage Mobile at https://www.mysagemobile.com to view your cash transactions.
- Invoice Payments - When you process a payment, Paya immediately creates a receipt in the general ledger account you selected in the Cash Account field within the Add Receipt group box on the Settings page of the Map Connection window. To view the receipt, open your accounting application and view a list of receipts or open the invoice or customer account to which the payment was applied to view the updated balance.
If you have questions or require additional information, please contact us and we will be in touch with you shortly.
How to Process transactions in Paya Connect Desktop
Product
Paya Connect Desktop (PCD)
PCD integrated solution
Description
Paya Connect Desktop provides a user interface for all types of credit card transactions such as sales, credits (or refunds), and vault storage. Software developers can enable or disable functionality according to the needs of the integrated application; therefore, the Paya Connect Desktop windows (and options) available to you vary depending on the application.
For example, some applications can process transactions such as credit card sales and credits. When you initiate a credit card transaction, the corresponding Paya Connect Desktop dialog box opens automatically to process the transaction.
Other applications may use Paya Connect Desktop only to store credit card data without processing transactions. Additionally, some applications can process “silent” (or non-UI) transactions, where the user is not required to swipe a card or to enter/verify credit card data in Paya Connect Desktop. These transactions are processed through Paya Connect Desktop then a confirmation message is returned to the application.
If you have questions or require additional information, please contact us and we will be in touch with you shortly.
How to store payment information in the Paya secure vault using Paya Connect Desktop
Product
Paya Connect Desktop (PCD)
PCD Integrated Solution
Description
The Paya Connect Desktop - Vault window allows you to store payment information in the Paya Vault. This window opens when you enter or modify payment information for a customer in a PCD integrated solution that allows for vault storage. This window does not submit a transaction for payment.
Resolution
- Within the integrated software select whether you are storing a credit card or an ACH account.
- Once the Paya Connect Desktop - Vault window is launched by the software enter the payment account number like a credit card number.
- Enter the expiration date if applicable.
- Click the submit button to save the payment information in the Paya Vault.
If you have questions or require additional information, please contact us and we will be in touch with you shortly.
FAQ
What swipers are supported by Paya Connect Desktop?
Product
Paya Connect Desktop (PCD)
Description
Paya will regularly make changes to the list of PCD supported devices as PCI compliance regulations change.
Resolution
Please check PCD under the settings menu for the most current list of compatible devices.
The Paya Connect Desktop is compatible with the following devices:
Non-EMV Hardware
- IDTech SREDkey
- Magtek DynaMag/DynaPad
- Magtek Centurion (Paya Encrypted)
- PCD will no longer support unencrypted solutions due to PCI compliance regulations.
EMV Hardware
- Equinox L5300
- Ingenico iPP320 (Paya encrypted OS must be installed)
- Ingenico iPP320 (Moneris Encrypted OS for Canada only)
P2Pe Hardware
- Ingenico iPP320 PCI listed (Bluefin):
- For more information about P2PE - What is the difference between Point-to-Point Encryption and End-to-End Encryption
- If you think that Point-to-Point Encryption is the solution you need for your business, please contact our Support Team.
To use a specific swiper type, you will need to enable that swiper type in Paya Connect Desktop under the settings menu:
If you have questions or require additional information, please contact us and we will be in touch with you shortly.
Troubleshooting Articles
How do I configure AVS and CVV prompts on the SRED Key device?
Product
SRED Key device
Resolution
With the SRED Key device connected to a USB port, the display will read, "Swipe Card or Key-in Card Number"
Press the #Admin key
The display will read "Select Manual Config 1-6:"
Press the corresponding number key to make one of the following selections:
1: Card Number/Expiration Date
2: Card Number/Expiration Date/Zip Code
3: Card Number/Expiration Date/Street Address Number/Zip Code
4: Card Number/Expiration Date/Security Code/Zip Code
5: Card Number/Expiration Date/Security Code/Street Address Number/Zip Code
6: Card Number/Expiration Date/Security Code
Press the Enter key
